Salesforce Invoicing is a powerful and flexible solution that streamlines the billing and invoicing process for businesses of all sizes. As an integral part of the Lead to Cash process, this invoicing tool enables organizations to create, send, and manage invoices seamlessly, helping to improve efficiency and cash flow.
Designed with the user in mind, Salesforce Invoicing offers customizable invoice templates, automated billing and payment reminders, and real-time reporting and analytics to further improve the overall billing and invoicing process.
By adopting Salesforce Invoicing, businesses can save valuable time, reduce manual errors, and enhance the customer experience. Its automated features ensure timely and accurate invoicing, while the robust reporting capabilities enable data-driven decision-making for better financial management.
Before we dive into the capabilities of Salesforce Invoicing, we’ll define some key terms used throughout the article, as these may not be terms everyone is very familiar with.
| Term | Definition |
|---|---|
| Billing Rules | The conditions under which sales are to be invoiced, specifying when and how order products are to be billed in a given billing scenario. |
| Billing Treatments | Determine how the invoicing process is handled for an order product. |
In short, Salesforce Invoicing is a must-have tool for any business looking to optimize and simplify their invoicing processes.
What is the difference between Salesforce Billing and Salesforce Invoicing?
Salesforce Billing offers a complete solution for the post-quoting business process of fulfilling orders, creating and sending invoices, and recognizing revenue.
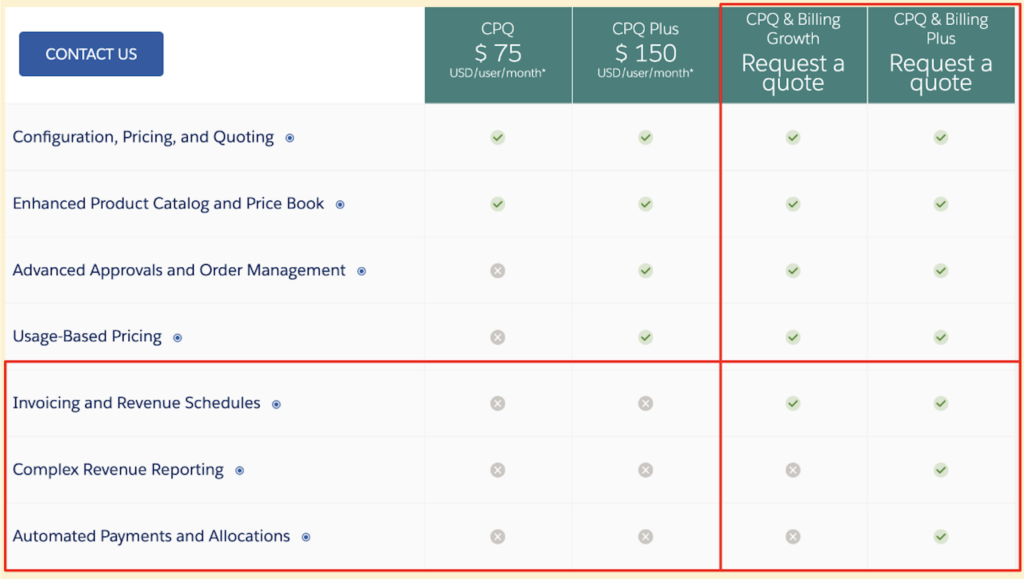
Salesforce Invoicing is an additional add-on available as part of the CPQ & Billing product offering. It seamlessly automates the generation and even sending of invoices based on quotes and orders in Salesforce CPQ, saving you time and improving the customer’s experience as they receive a correct invoice on time, every time.
Salesforce offers four levels of their Revenue Cloud product offering, as seen on their website. The two columns on the far right include Salesforce Billing and Invoicing features, with the column furthest on the right offering all invoicing features.

Salesforce Billing includes the ability to create invoice records, generate invoice documents from invoice templates, and automate the sending of invoices. What it doesn’t do is automate the collection of payment and automatically allocate the payment in your financial records. To do this, as well as complex revenue reporting, the Salesforce CPQ & Billing Plus license is required.
Depending on your business needs, you could start off with the CPQ & Billing Growth license and upgrade in the future if you feel your business requires additional functionality.
READ MORE: A Complete Overview of Salesforce BillingSalesforce Invoicing significantly improves efficiency within a business by automating and streamlining the invoicing process. Disjointed processes lead to data mismatches.
The invoicing process differs by organization, but usually, someone has to create invoices based on orders that have been processed, which is a manual task and is typically not automated. Invoices typically have payment terms attached to them, such as Net 30 or Net 60 days, which effectively means you as a business are extending a line of credit to your customers to give them a certain window in which to pay for their goods and/or services.
By not invoicing your customers on time, you are further extending the period in which you have not been paid for your goods and/or services. Cash flow is necessary for every organization to fund overhead costs such as staff salaries or the purchase of materials.
With Salesforce Invoicing, it’s easy to automate the creation of invoices based on the status of orders in Salesforce. When an order’s status changes to completed, the system can be configured to automatically generate the invoice record in Salesforce, including invoice lines, and even send the invoice directly.
By integrating Salesforce Invoicing with other modules and accounting software, businesses can gain a holistic view of their financial health, allowing for better decision-making and resource allocation.
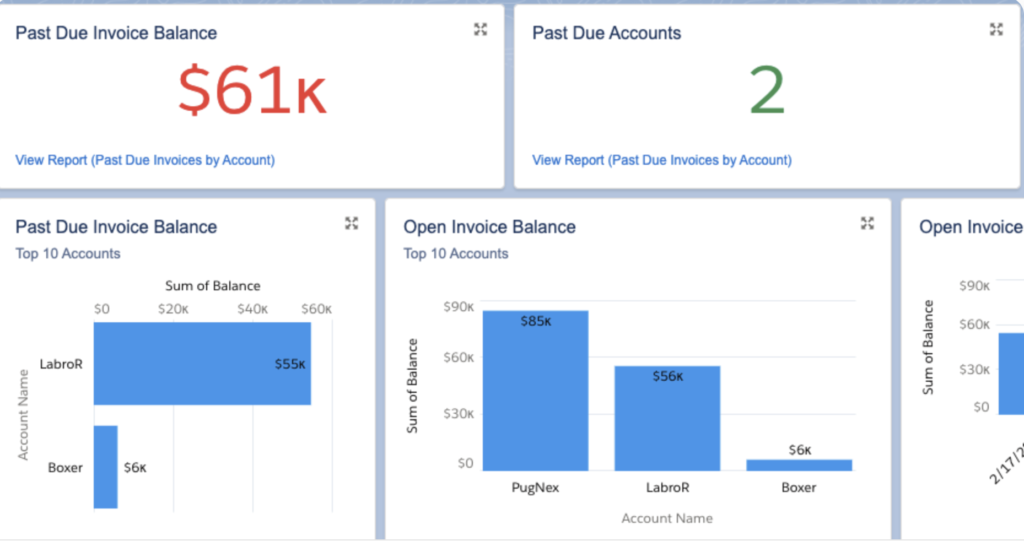
Moreover, real-time reporting and analytics offer valuable insights into payment patterns, outstanding balances, and revenue trends, enabling organizations to identify areas for improvement and optimize their invoicing practices.
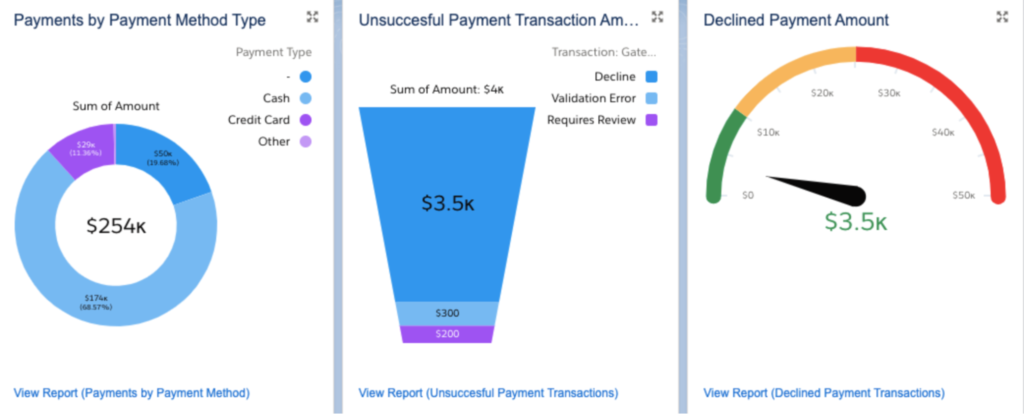
Overall, Salesforce Invoicing enhances efficiency by reducing manual tasks, improving cash flow, and providing actionable data for informed decision-making.
In order to set up Salesforce Invoicing, there are a number of prerequisites and requirements that must be met. First and foremost, licenses for Salesforce Billing, including invoicing, must be purchased and active, and the Salesforce Billing package needs to be installed in all sandboxes where development will take place, as well as in your production environment.
Aside from the obvious license and package requirements, the user setting up the tool needs the required permission sets. It’s important for the user who is setting up Salesforce Invoicing to have a clear understanding of how to create invoice plans, generate invoices, and manage payment collections. In this case, the Salesforce admin should grant the necessary permissions to the user setting up the tool.
In addition to these basic prerequisites, you need to have already set up Salesforce CPQ, including defining products, price books, bundles (if used), product and/or pricing rules, and more. Salesforce Invoicing will take the information directly from Salesforce CPQ (quotes and orders) to create invoices, so it’s essential this process is in place prior to configuring Salesforce Invoicing.
The last requirement is to, of course, do the setup in a sandbox environment. If you’ve already set up Salesforce CPQ, you will be familiar with the reference data used in Salesforce CPQ & Billing objects, which will be the same for Salesforce Invoicing. It is highly recommended to invest in a third-party provider to migrate CPQ reference data due to the complex nature and effort required to move this data without an automated tool.
If you’re setting up Salesforce CPQ for the first time, check out our guide for six tips from a Salesforce CPQ Specialist.
Now that we know what role Salesforce Invoicing will play in our organization, we can take a detailed look at some basic setup. Invoicing is a very complex process depending on where organizations operate, what sort of products they sell, and what their revenue model is like – so setting up Salesforce Invoicing will look different for every organization. We’ll cover some basic information about the objects and how they work together to understand more about Salesforce Invoicing.
Start by creating a new sandbox environment for your Salesforce Invoicing implementation. It is recommended to spin up a new sandbox that will only be used for Salesforce CPQ & Billing work to reduce any issues that may arise with other developments happening within your organization.
Once you login to your sandbox, the first thing to do is to configure the package level settings.
Go to Setup and locate the Installed Packages page in the quick find search. Click Configure for the Salesforce Billing package.
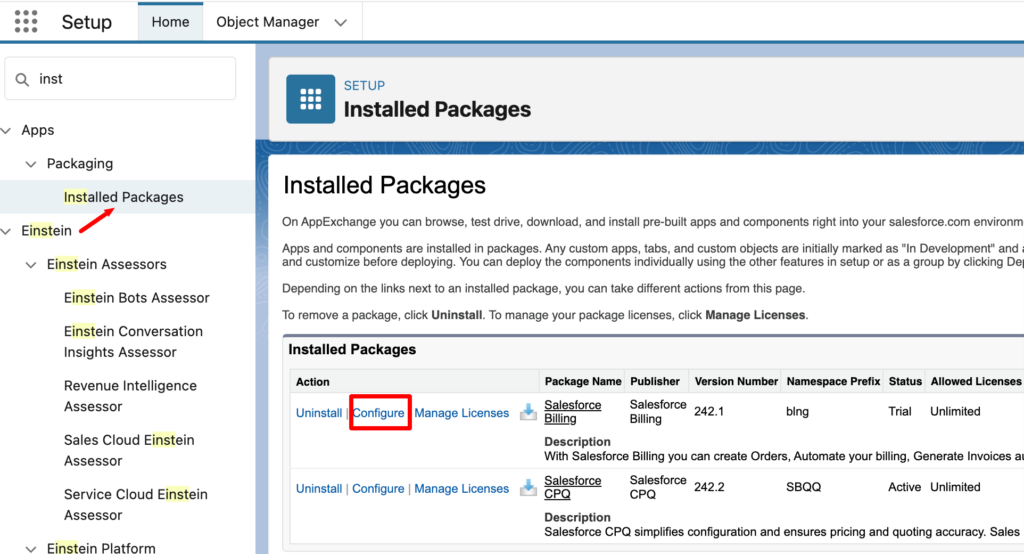
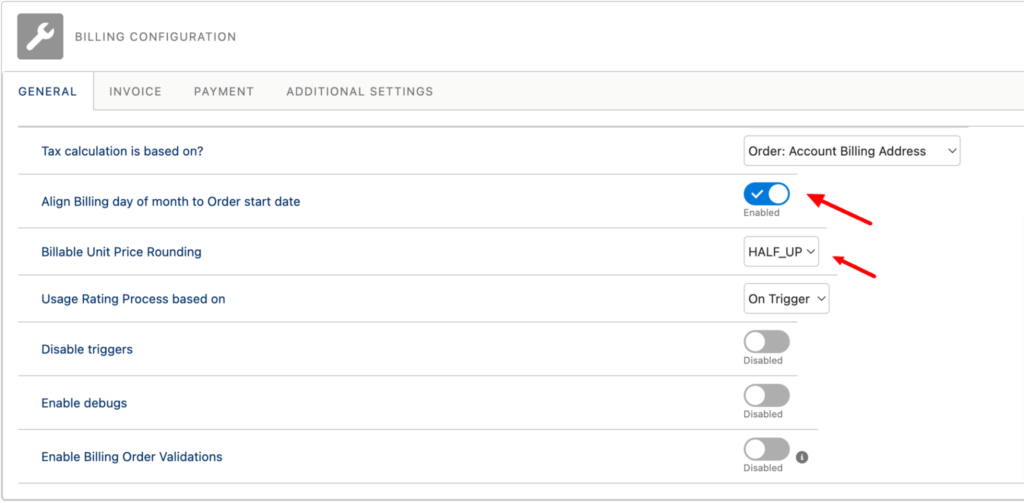
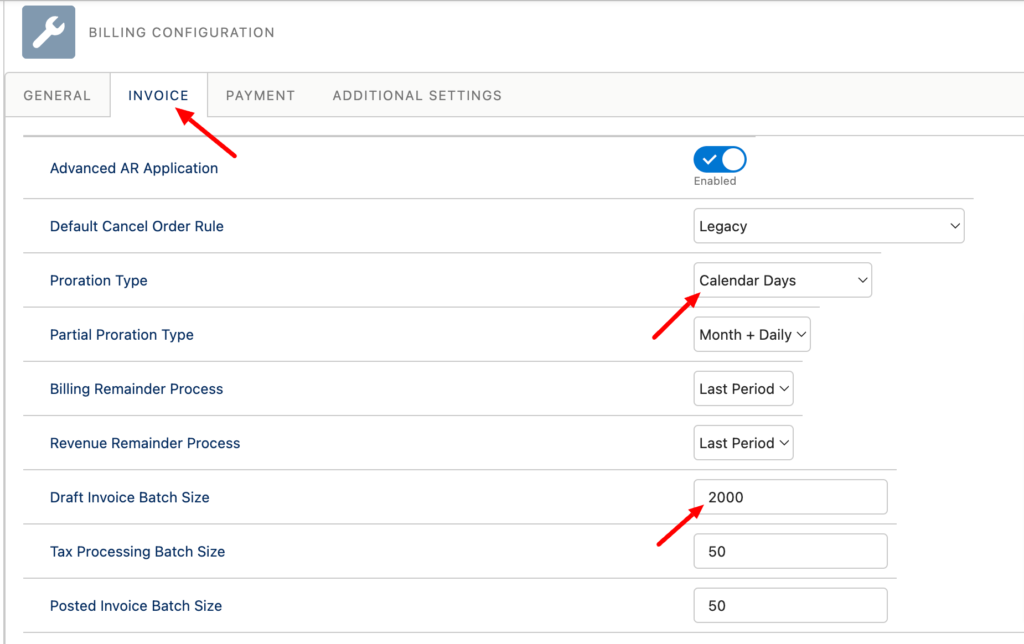
On the Billing Configuration page, you can modify any relevant settings for your organization. You can define the address field, which is used for tax calculations, define the billable unit price rounding, set the proration type, and billing and revenue remainder processes.
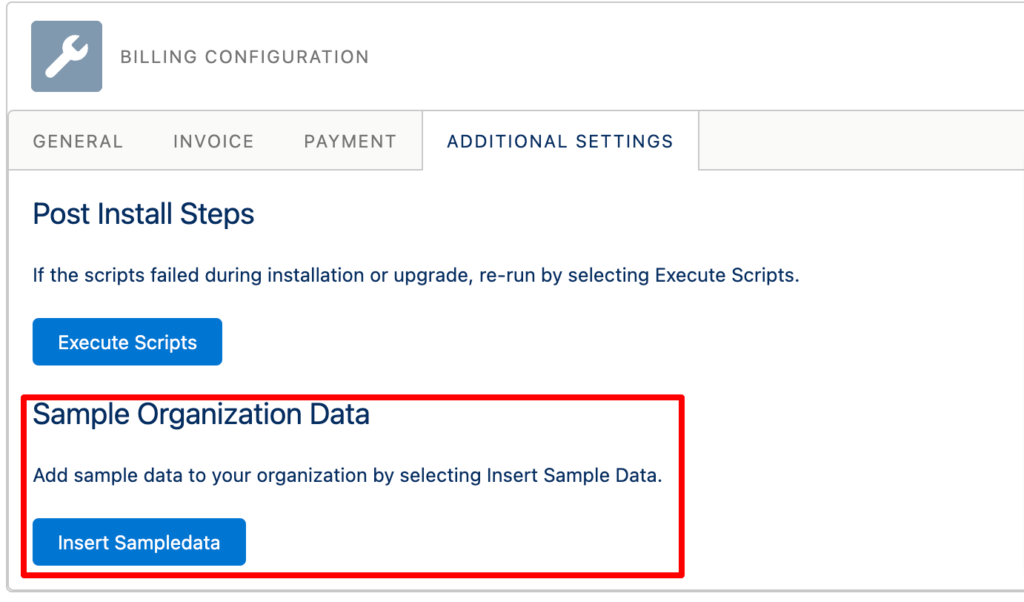
In the Additional Settings tab, there is a handy tool that will insert sample data into your org. This can be helpful to see how objects are related to each other and also to see sample records to help you in your setup.
To save your invoice settings, simply click on the Save button.
Next, you’ll want to set up the billing rules and billing treatments under the Salesforce Billing Configuration app.
If you inserted the sample data in the previous step, you will see the records that were created during that step.
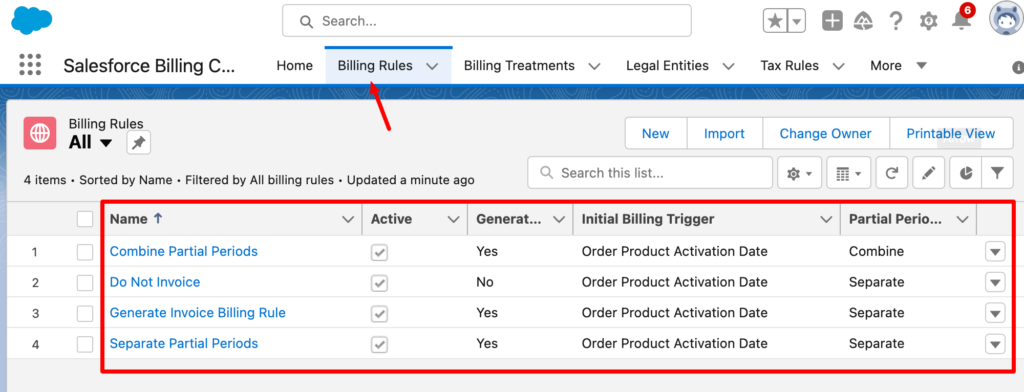
Essentially, billing rules are the logic that determines the billing behavior of your products. They establish the timing, frequency, and quantity of charges that should be billed for a product within a billing schedule.
For example, if you sell a subscription service, you can use billing rules to define whether the entire subscription amount should be billed upfront when the subscription begins, or whether it should be billed in monthly or yearly increments for the duration of the subscription term.
You also need to review your product records to ensure they have the correct billing information defined. Because Salesforce CPQ will need to be set up alongside Salesforce Invoicing, most of this work should already be done to define your subscription vs. one-time products. However, there are a few other fields to review for subscription products that pertain specifically to invoicing.
Every product requires a billing rule, tax rule, revenue recognition rule, and charge type to be defined. However, for recurring products, you also must define the Billing Frequency and Billing Type fields.

Therefore, understanding and configuring billing rules is an important part of setting up Salesforce Billing to accurately reflect your business’s billing procedures. Always ensure that your rules align with your sales agreements, revenue recognition policies, and business practices to maintain customer satisfaction and regulatory compliance.
Once you’ve defined your billing rules and treatments, the next step is to set up tax rules, tax treatments, revenue recognition rules, and any payment gateways you might want to use to automate the collection of payments.
Tax rules consist of the tax rule record and the related tax treatment record.
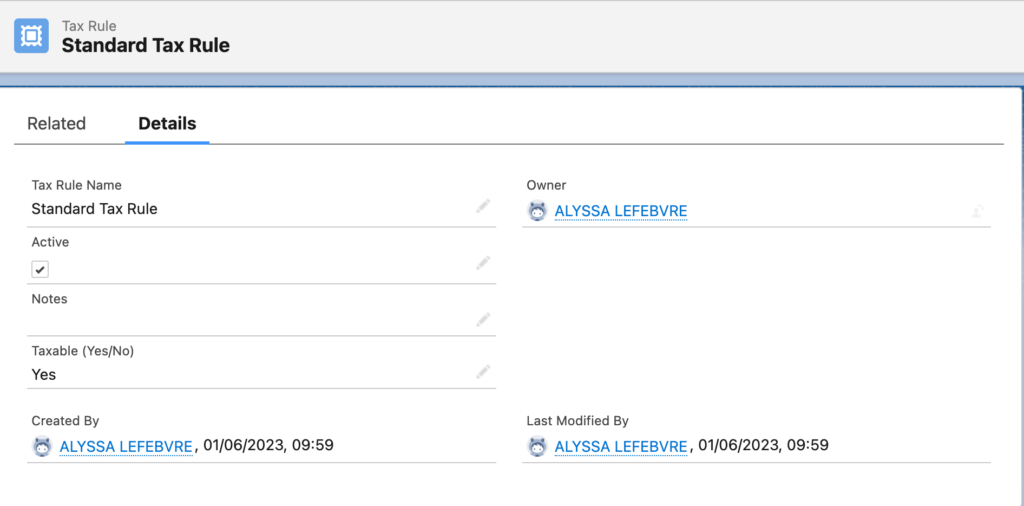
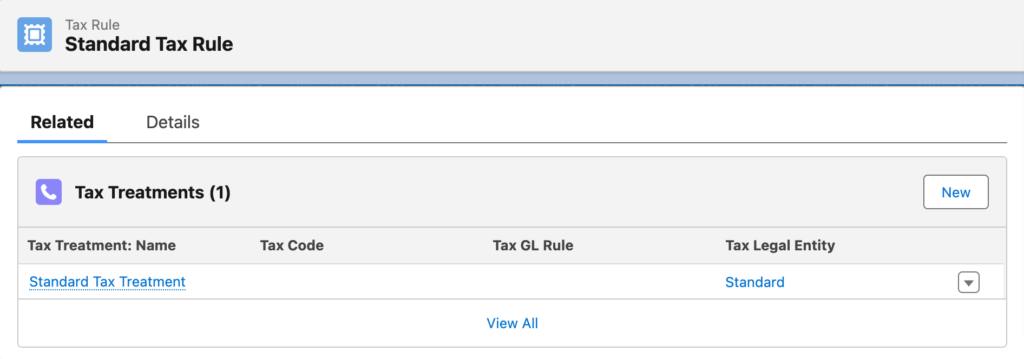
Since each product is defined with a tax treatment, this is how the system knows which tax treatment to apply to each order product. It’s also important to set up the legal entities that relate to the tax treatments.
You will also need to set up tax rates if you’re not using a third-party tool to define tax rates automatically. These will need to be defined for each area you are selling to, so this could result in thousands of individual records that need to be created.
Tax rates are assigned to the legal entities you create. Then, based on the billing address of your order/order products, the appropriate rates will be applied to the order products and rolled up to the order.
Setting up tax information can be complex, and it’s critical to get this right – so if you are not an accounting/finance expert, it’s important to consult a qualified professional to ensure the system is set up to adhere to the required tax laws where you sell to customers.
Revenue recognition rules are defined to tell the system how to recognize revenue for each order product, as products will have different recognition types based on their billing frequency and billing type.
For example, a one-time charge product, invoiced in advance, can have all its revenue recognized at once in most cases because the product was delivered to the customer and the revenue was collected in full. Alternatively, a yearly subscription product that is billed monthly will need to have its revenue recognized over time according to GAAP and ASC 606 compliance rules.
Payment gateways can be set up to automate the collection of revenue from customers, further reducing your need to chase up customers who have not paid their invoices. Salesforce work with a number of payment providers, such as Stripe, PayPal, and others, to ensure your customers have flexibility when paying their invoices.
You can find all the possible payment providers on the AppExchange, and there will even be others you can integrate with using the Mulesoft AnyPoint Platform or other integration tools such as Zapier. Simply searching for “Payment” on the AppExchange and selecting apps with five-star ratings only results in over 350 suppliers.

Integrating with a payment provider means invoices can be automatically changed to “Paid” when a customer pays their invoice, reducing the need for manual reconciliation between what’s come into your account versus what has been invoiced.
An element of Salesforce that facilitates seamless integration is Salesforce Billing, which includes Salesforce Invoicing. This feature transforms the lead-to-order data from Salesforce CPQ into transactional information. This transformation allows ERP systems to receive equivalent data, which can then be leveraged for various accounting tasks.
Salesforce Billing is not meant to replace your existing ERP; it’s meant to complement it and improve the downstream processes between your CRM and ERP systems. Salesforce Invoicing can be integrated with almost any accounting software, but of course, some tools are easier to integrate than others – especially ones that are built natively to the Salesforce platform or ones that have pre-built connectors to Salesforce. If your existing ERP solution doesn’t have either of these features, you can use a tool like the Mulesoft Anypoint Platform or Zapier to integrate the solutions.
Remember, each organization has unique needs and processes, so you may need to further customize Salesforce Invoicing to fit your requirements. However, these general steps should give you a good starting point.
We know that Salesforce Invoicing is an extension of Salesforce CPQ. Salesforce CPQ improves the quoting process for users; however, Salesforce Invoicing is what completes the overall Lead to Cash lifecycle – with emphasis on the “Cash” process.
In conclusion, Salesforce Invoicing is a powerful, robust billing and invoicing tool that, when used in conjunction with Salesforce CPQ, can take your lead to cash process from good to great!
Automating this part of your business and having the information available in your CRM will significantly improve your customer’s experience when dealing with quotes, orders, payments, and invoices.